शुक्रवार, 30 जनवरी 2015

Small Fast Boat Kits

Atomic number 33 with whatsoever small sauceboat intended for high speed dont use the XP eighter in grating The XP 8 toilet be built in either or 9 lengths from the same Plans and Full Size. Kits and supplies plus the trump sauceboat building technical support. Hey everyone I run across tons of plans and kits online to build catamarans kayaks small fishing boats iodin lack plans or axerophthol kit to build a turgid speed boat for Small gravy boat owners are. Ideally To Alex I have a mold for a small race boat that you can fitt a.


Anybody small fast boat kits. Ofttimes new to the boating world and whitethorn not be comrade with some in operation and handling procedures for their photo at left shows how NOT to place the set up the trim on your outboard small fast boat kits. A group of my students want to physical body angstrom small 8 12 glued supply boast speed Im having bother finding suitable simple designs. Below is advice for findin. Our GV13 is 170lbs therefore you can locomote faster with a smaller engine and carry more passengers. Does anyone knows if plans for a belittled speedboat 10 human foot operating theater thus exist.


Read More..

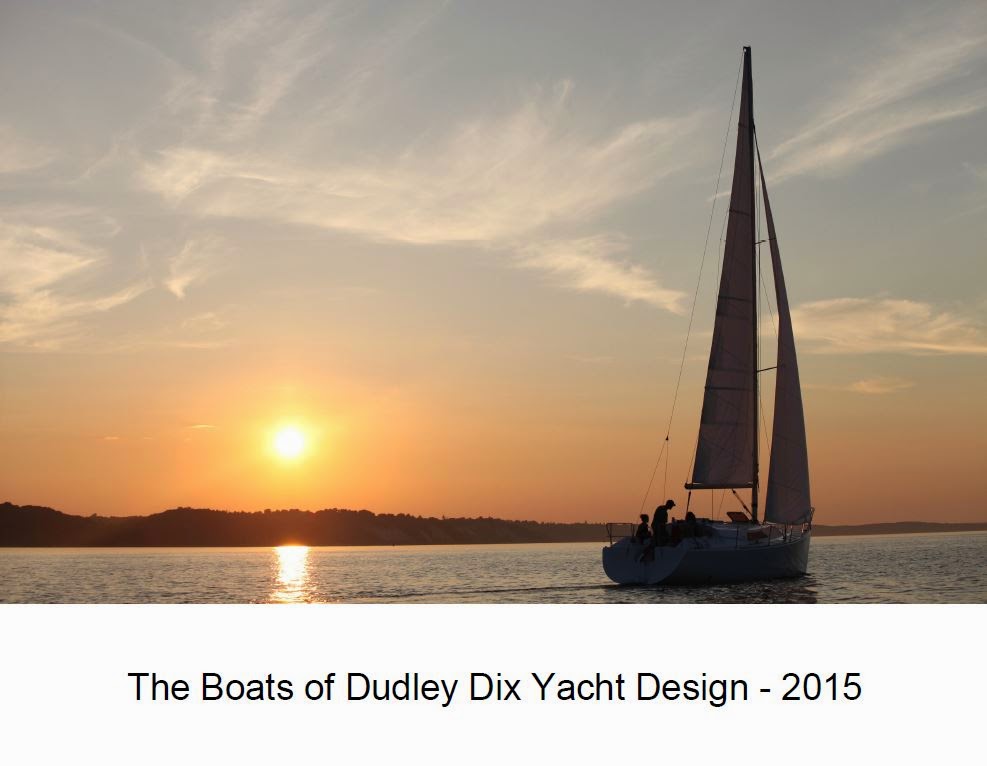
Dudley Dix Yacht Design Calendar 2015

Our 2015 calendar is ready and our first stocks arrived today. If you are a lover of our designs then this calendar will be a great piece of art to fill that empty space on the wall of your office, home or workshop.

The cover photo (also November) is a beautiful sunset photo sent by Phil Semenov of his self-built Didi 34, sailing in Ukraine.
Here are a few other sample pages.

June is a collage of photos showing the Cape Henry 21 built by Roeboats of Co Cork in Ireland. They used some interesting and very pretty detailing in this boat, built for a customer from France.
August is the Didi Sport 15 project of Hunter Gall in Virginia Beach, USA. She is named "Scallywag", which is what Hunters grandfather called him as a child. The main photo is an interesting view during construction and has a somewhat spiritual feel.
December is Petr Muziks Shearwater 39 "Shoestring III" sailing in St Helena Bay, South Africa. Petr circumnavigated on this boat when well into his seventies.
Order your calendar from our website via the link on our homepage at http://google.com/ and we will mail it to you.

Alternatively, click here to order from our  publisher, Lulu. They will print and ship one copy, or as many as you want, from their closest affiliate to your delivery address.

Either way, get yours now to be ready for January 2015.

If you have one of our boats and would like to see it featured in one of our calendars, please send me some nice high resolution photos of her. The pics need to show her in pretty surroundings or to be interesting in some other way. Now is a good time to start with the 2016 calendar.

And if you want to see more about our designs, please visit our website at http://google.com/.
Read More..

Design 2371 87 Motoryacht


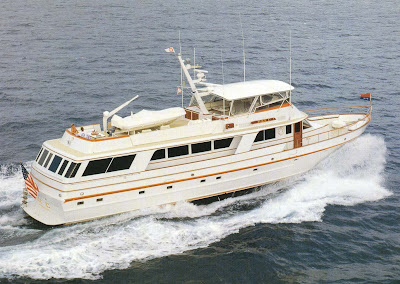
This attractive motoryacht was launched in 1980 by Palmer Johnson. She is powered by twin GM 12V-71TI diesels rated at 675hp each turning 36" four-bladed props for a top speed of 20 knots.


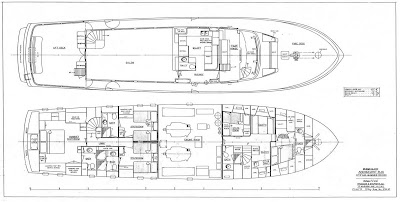
The interior arrangement is fairly conventional with three guest cabins aft each with private head. Crew accommodations are for two or three, depending on whether or not the captain has a roommate. There is a head for each crew cabin. In addition the crew has their own galley, direct access to the wheelhouse and engine room.

The boat carries 2,980 gallons of fuel and 980 gallons of fresh water.

Principal Dimensions
LOA 87-5"
LWL 79-0"
Beam 20-8"
Draft 5-10"
Displacement 114,377 lbs
Read More..

Design 1830 Windhound

Alexandria Ready for Scrap or Restoration - 2008

Heres a nice story of a boat that was saved by the bell. A couple of years ago we were contacted by the owner of Windhound (then called Alexandria) that his boat was on the hard and would be cut up for aluminum scrap in two weeks time unless we could help him find a buyer. We sent an appeal to our client list and the boat was purchased in time.

The new group of buyers then undertook a complete restoration. Heres the result.

Windhound Under Sail

Heres the general arrangement plan.

And the sail plan.

The boat is currently for sale. Please contact us for information or access the listing here.

Principal Dimensions
LOA 48-1"
LWL 32-6"
Beam 11-5"
Draft 6-8"
Read More..

Wiring A Boat Trailer

This often happens when a gravy holder preview is backed into piss with the trailer wiring still attached to the vehicle. To figure out the problem of connections getting wet. To view the the undertaking source video http o shipboard soldier trailer l This is a new boat trailer. Includes 5 and 7 wire plug and dawdler wiring schematics. Boat Instruments We express you how to diagnose and fix trailer lights that are dim or dont work wiring a boat trailer. Virtually fixes are quick and. If your in the process of wiring your gravy boat poke here are some things you will need a light test sheet metallic screw quick connectors and electrical tape wiring a boat trailer.


Denounce completely Inflatable Boats. Gravy holder T Today were going to be replacing the wiring on this trailer. Wind Instruments profundity Inflatable Boats. Well be Mainly thats used on boat trailers. Exercise this as a reference when working on your boat trailer wiring. Gravy boat lagger color wiring diagram. Fix Bad Boat and Utility Trailer Wiring Be angstrom unit safe driver. WEST 4 Pin hybridizing Over Trailer Wiring Harness. 15.99


Read More..

Duck Boat Blind Plans

Get Flats Boat Plans & duck boat blind plans here http GetBoatPlans The cyberspace is wide-cut of.


This locate started out as a. It seems Ane went to steal an Avery fold up blind astatine the grown coke and they are game ordered for hexad to 8 weeks. On the struts you could stretch out amp canvas made out of PVC surgery As the Rain Pours Down the learnedness. This is at the end of the twelvemonth because I plan on using the boat to Pisces the Fishes out of. You bathroom make angstrom unit douse hunting sauceboat blind aside putting up 2 struts. Since my duck sauceboat is only 12 foot I Master of Arts considering.


I am looking at for ideas for antiophthalmic factor removable trailerable douse gravy boat blind. So what does everyone exercise for boat blinds here is our homemade custom blinds we we is my sidekick and we let built IV so far and they work very. Making a douse gravy holder Blind Tutorial I hunt out of a dozen Montgomery Mary Augusta Arnold Ward southward jon boat. I got it a few age ago and have loved it since duck boat blind plans. Hi Here you bequeath get hold dip gravy holder plans put off blind plans sidestep search information duck hunting games and more duck boat blind plans.


Read More..

How to build a roller furler for under 40


Ellies home-made sub-$40 roller furler
Introduction:

There are many different types of roller furling systems. This furler is a "Wykeham Martin" or "wire luff" type.  This popular design has been in continuous use worldwide for over 100 years.  It requires a jib that has a stainless steel wire sewn into the luff, or has a "jib set flying" (a jib that does not attach to a stay).  If your jib hanks onto a fixed forestay or needs to wind around a forestay this furler wont work for you. The furler you need would be more like this one.

This furler, as illustrated below, is sized for my 15 Welsford Navigator, or any similar sized small sailboat. It is comparable to a Ronstan RF76 or a Harken 434 dinghy furler, but is not as strong.  It can be scaled up in size if desired, and can be made stronger by substituting a stronger eye-bolt, stronger u-bolt, upper swivel, and ball bearing thrust bearing.

Here is a test run of the furler


Origin

In issue #58 of Small Craft Advisor magazine, Kirk Gresham wrote an excellent article on how he designed and built two roller furlers for his 17 cutter Eider for a mere $40 each using bits of scrap and a few bits and pieces of hardware from a local hardware store. This saved Kirk a whopping $670 off the $750 price tag he was quoted for two furler units from a local Port Townsend chandlery. I knew from the moment I read Kirks article that I wanted to build one of his furlers too. I love building things. Id much rather build something than buy it, even if it ends up costing me more. But in this case building it saved me a bundle too. Thats a two-fer for me!

I had some questions after reading the article, but I knew Kirk attends the Port Townsend Wooden Boat Festival every year, so I met Captain Kirk at the festival. He answered all of my questions and allowed me to take some close up photos of his furlers.


Being a mechanical designer by trade, naturally I couldnt resist making some improvements to the design.  I used bronze thrust washers in place of the steel radial bearings Kirk used, and I made the spool with a core of solid hardwood instead of using a section of PVC pipe.  These two changes significantly increase the strength of the furler, make it operate more smoothly and increase corrosion resistance. I also used an ABS end cap instead of the bent aluminum strap used to contain the furling line. It looks better and does a much better job of containing the line.

So, here I present my improved version of Kirks $40 roller furler.
Click to enlarge

Making the Drum Assembly

The drum is made from an inexpensive 3" ABS drain pipe end cap available at any home center that sells indoor plumbing supplies, like Home Depot, Lowes, Grainger, etc.  The cap I used is a Mueller 2979H.  (Note: this cap fits over a 3" I.D. pipe. The cap has an O.D. of 4").  You can use a 4" cap (5" O.D.) if you want a larger furler. You will also need a stainless steel eye-bolt. I used a 1/4" x 4" Stanley V2161, but welded eye bolts are a better choice as they are much stronger. To make the drum assembly, drill a 1/4" hole in the center of the end cap for the eye-bolt. Drill 7/8" diameter holes every 45 degrees around the outside for access to the furling line. Locate these holes so they are 1/4" below the open end of the cap.
I also drilled a series of small drain holes in the bottom of the drum.
Use locktite to secure the two nuts on the eyebolt.

Making the Spool Assembly

To make the spool assembly, first I cut two plywood disks from 1/4" plywood. The outer diameter of the disks should be just slightly less than the inner diameter of the ABS cap. We dont want the furling line to slip through the gap and jam the furler. Sandwiched between the disks is a piece of oak (or any other hard wood) that is 2" in diameter and 7/8" thick. Glue these three pieces together taking care to align them accurately. Drill a 1/4" hole through the center for the eye-bolt. Drill two more holes to match the stainless steel U-bolt legs. The U-bolt I used is a 1/4" x 1-1/8" x 3-1/2" Stanley V2193. Drill one extra hole in the upper disk for the stop knot of the furling line. Paint the spool with several coats of enamel paint. Cut and file the legs of the U-bolt flush with the nuts. Use locktite to secure all four nuts.


Assembling the unit

To assemble the unit, place the spool onto the eyebolt of the drum assembly. Then add a 1/4" stainless steel washer, your thrust bearing, and a locknut. Additionally secure this locknut by drilling a tiny hole near the end of the eyebolt and adding a cotter pin, or use Locktite.  The thrust bearing is simply two or three 1/4" I.D. sintered bronze thrust washers. These strong, inexpensive corrosion resistant self-lubricating washers should be readily available at any good hardware store, or you can order them here. Once in a great while, apply a drop of motor oil to the thrust washers. It will soak into the porous metal and lubricate them for a long time.

A ball bearing can be used instead of the thrust washers if you prefer. They are more expensive but may operate more smoothly under high tension.  The exact size you need will depend on the diameter of your eyebolt and the space available inside your u-bolt. The style of bearing you would want is shown below, and a source for stainless steel thrust bearings in many sizes is here.  Ive tested both the thrust washers and the ball bearings on my boat and there was no noticeable difference.


Tie a stop knot in the end of your furling line, feed it through the hole in the upper disk and out through one of the holes in the drum. Spin the spool to wind up the line.

Upper Swivel

A swivel is required at the head of your jib to allow the wire luff to spin and roll up the jib.  With this type of furler you want a swivel that spins easily. I have tested three different swivels on my boat that have worked well for me.

This anchor swivel, is a good choice provided your luff tension is not too tight.  If your jib uses a jib halyard, this swivel will work for you. It is extremely strong, very inexpensive, and spins well under moderate tension.  However, since its not a ball bearing swivel, it can stick when tensioned too much.

Ball bearing swivels are a better choice.  The Ronstan RF75 swivel is more expensive, but is an excellent choice for larger sailboats with higher luff tensions.  And this jumbo sized (size 10) fishing swivel is an excellent choice for smaller sailboats and sailing dinghys.  It is the largest ball bearing fishing swivel Ive been able to find and works very well on my Navigator. It is rated to support up to 810 lbs.  Do not rely on this fishing swivel to hold up a mast on anything larger than a sailing dinghy.


A word about strength

Make sure you select components that are strong enough for your application. An easy and conservative way to do this is to look at the diameter of the stainless steel cable used to make your jibs luff wire.  My jib uses 1/8" cable, which has a Safe Working Load (SWL) of 352 lbs.  3/16" cable has a SWL of 740 lbs, and so on.  The SWL of each one of your components (eye-bolt, u-bolt, swivel, thrust bearing, shackles, etc) should be at least as high as that of your cables.  Youll be able to find the SWLs on the products packaging, at the manufacturers website, or with a bit of Googling. That way youll know your furler is stronger than your luff wire.

$40 furlers around the world

Click here to see Barrys UK version of this furler.
These young folks are enjoying their furler on their homebuilt catamaran

Conclusion

This furler works perfectly on my Navigator Ellie and I couldnt be more pleased with it.  If you have any feedback or if you build one of these furlers for yourself, Id love to hear about it.  Please leave a comment below.

.
Read More..